Kinetic Tools
Documentation
Opening the Kinetic Tools Overlay
The Kinetic Tools overlay appears automatically in the Scene view when the package is installed. If you don’t see it:
- Open a Scene view window
- Click the vertical dots dropdown button in the top-right corner of the Scene view
- Select “Overlay Menu”
- Select “Kinetic Tools” from the overlay menu
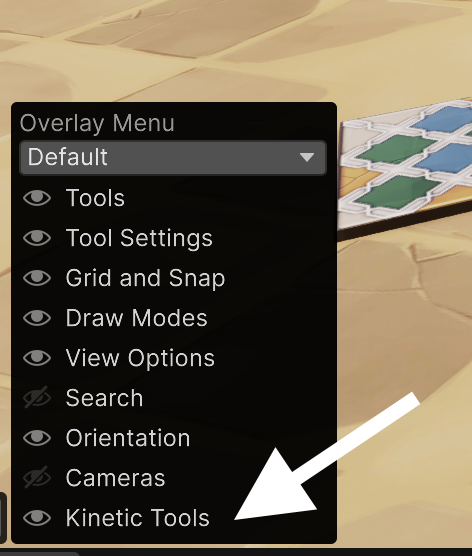
Accessing Kinetic Tools from collapsed Overlay Menu
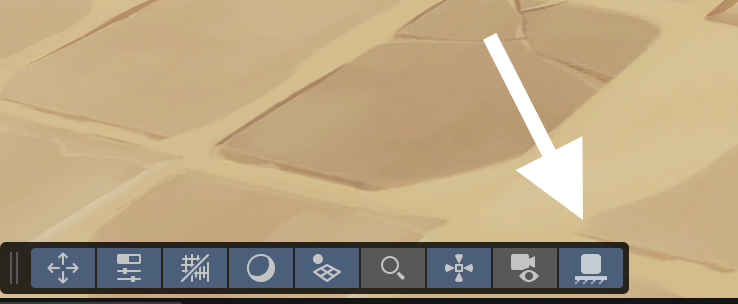
Accessing Kinetic Tools in expanded Overlay Menu
Gravity Tool
- Shortcut: Hold Shift+G (customizable in Shortcut Manager)
- Applies realistic physics to selected objects
- Objects will fall and collide with other objects in the scene
- Simulation Speed, Bounciness and Friction can be adjusted in the Kinetic Tools overlay
Controls and Settings
- Hold Left Mouse Button while gravity tool active: Attaches a physics spring to objects
- Drag to pull objects with physics
- Mouse Scroll Wheel while spring active: adjusts spring distance from camera
- Release Mouse Button to let objects react naturally
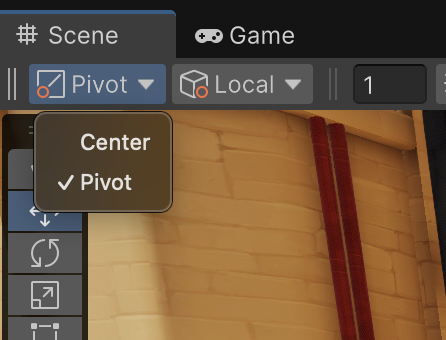
- Pivot Mode (Pivot setting in Scene Window. Typically found in top left corner of Scene Window, or toggled by pressing Z key):
- Center: Treats all selected objects as one combined physics object
- Pivot: Simulates each selected object independently
- Note: You can select multiple objects inside one hierarchy, for example: Parent, Child1, Child2. In this case all three objects will be simulated separately. If you select only Parent object, all object in its hierarchy will be simulated as one object
Snap to Surface Tool
- Snaps selected objects to visible surfaces while considering collisions and orientation.
- Modifier Keys Shortcut: Hold Ctrl+Alt (Windows & Linux) or Cmd+Option (Mac) - customizable in Advanced Settings
- Alternative Shortcut: Hold Shift+X (customizable in Shortcut Manager)
Orientation Features
- Orient to Surface Normal (toggle with Left Click while snapping)
- When enabled: Aligns rotation of objects to surface normals
- When disabled: Maintains original object rotation
- Object Axis (cycle with Right Click while snapping, or from overlay menu):
- Defines which axis points away from the surface
- Mouse Scroll Wheel rotates object around selected Object Axis while snapping
- Pivot Mode (Pivot setting in Scene Window. Typically found in top left corner of Scene Window, or toggled by pressing Z key):
- Center: Treats all selected objects as one combined object.
- Pivot: Each selected object will snap independently
- Note: You can select multiple objects inside one hierarchy, for example: Parent, Child1, Child2. In this case all three objects will snap separately. If you select only Parent object, all objects in its hierarchy will be snapped as one object

- Note: You can select multiple objects inside one hierarchy, for example: Parent, Child1, Child2. In this case all three objects will snap separately. If you select only Parent object, all objects in its hierarchy will be snapped as one object
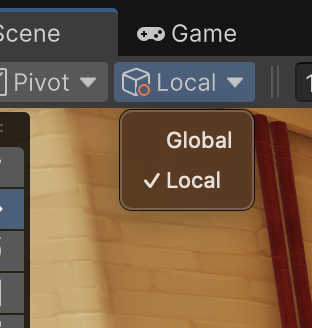
- Local/Global Rotation (Setting in Scene Window, on the right from Pivot Mode. Can be toggled by X key):
- Local: Use local object axis as input orientation to determine rotation on surface (Recommended in most cases)
- Global: Use global (world aligned) axis as input orientation to determine rotation on surface
- Useful in cases where you want to move a group of rotated objects along some surface, without losing rotation offsets
- If you decided to use this mode, you should probably select +Y axis as Object Axis, unless more unique case
Depenetration Modes
Control how objects are placed on surfaces
- Off: No depenetration. Objects will be placed on surface without offset, using current Pivot Mode
- Bounds Offset: Offsets from surface by object bounding box. a) No real collision, can push object inside other surfaces, but makes placement easier in most cases
- Physics Cast: Cast object from camera and place at closest surface a) More accurate depenetration (less likely to go inside other surface) b) Can be hard to place object exactly where you want, since any visible surface will stop object closer to camera
- Physics Cast With Self Collision: Same as “Physics Cast”, but each object also collides with other selected objects, when placed on surface
- Physics Simulation: Same as Bounds Offset to get initial point on surface, but calculates full physics simulation to find more natural placement
Advanced Settings
Accessing Advanced Settings
To access advanced settings:
- Click the “Advanced Settings” button in the Kinetic Tools overlay
- Alternatively, go to Unity’s main menu: Edit > Preferences > Kinetic Tools
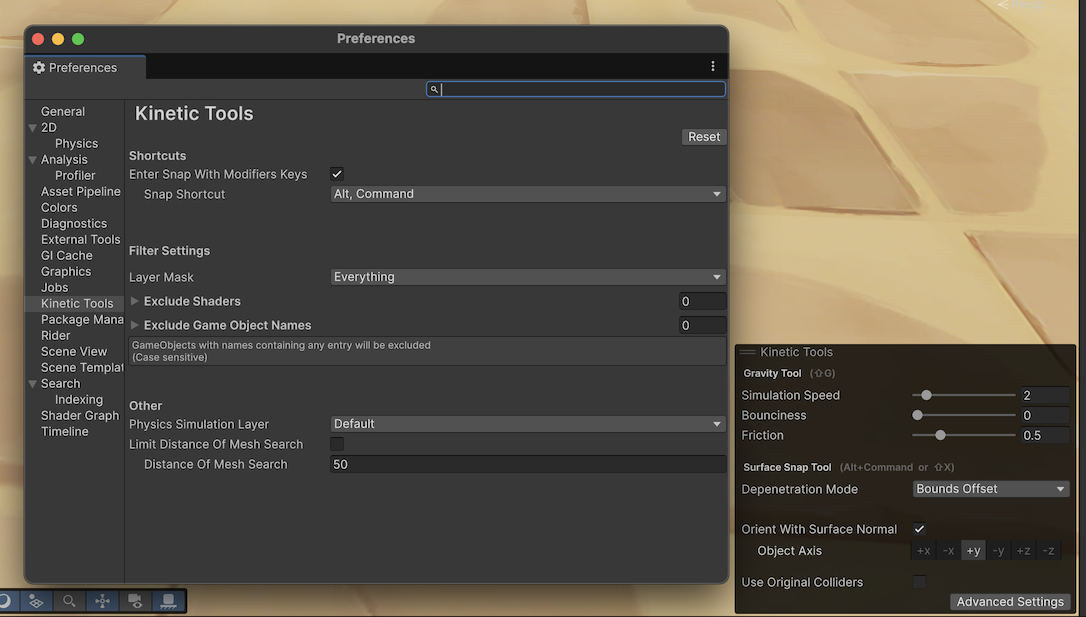
Shortcut Configuration
- Modifier Key Shortcut:
- Configure in Advanced Settings under “Shortcuts”
- Can be completely disabled
- Standard Shortcuts:
- Change via Unity’s Shortcut Manager (Edit > Shortcuts)
- Search for “KineticTools/Drop” (Gravity) and “KineticTools/Surface Snap”
Filter Settings
- Use these settings to filter visible objects when building physics scene for both Tools
- You can still use excluded objects as selected objects in both Gravity and Snap to Surface tools
-
Currently only MeshRenderers, SkinnedMeshRenderers and Terrains with its Trees are used then building physics scene.
- Layer Mask: Filter which layers to consider for collisions
- Exclude Shaders: Ignore objects with specific shaders
- Exclude GameObject Names: Skip objects containing certain substrings
- For example, the entry “Grass_” will exclude renderers named “Grass_01”, “DeGrass_Low”, “Grass_Green” e.t.c.
- Name comparison is case sensitive
- Custom Filter: You can extend filters with C# code. Example code:
// Inside initialization code
KineticToolsParameters.instance.Filter.ShouldIncludeObjectCustomPass += ShouldIncludeObject;


public bool ShouldIncludeObject(GameObject gameObject)
{
    // Your filter logic
    return true;
}
Other Notes
- Limit Distance of Mesh Search option (advanced settings): If your scenes contain a massive amount of objects, consider enabling Distance limit to improve performance.
- Physics scene will be created only around selected objects and Scene camera
- Improves performance by ignoring distant objects
- Use Original Colliders option (overlay menu):
- If checked, both Tools will try to find colliders on selected objects. If no colliders found, will fallback to default collision model
- Only for selected objects. Other visible geometry will generate default colliders
- Ignore Backfaces option (overlay menu):
- If checked, all raycasts will ignore backfaces
- Turn this option off when snapping to double-sided meshes
- Objects without Renderers can be used as selected objects. In this case, they will be treated as small sphere for physics simulations, or as single point for snapping without physics.